硬件介绍
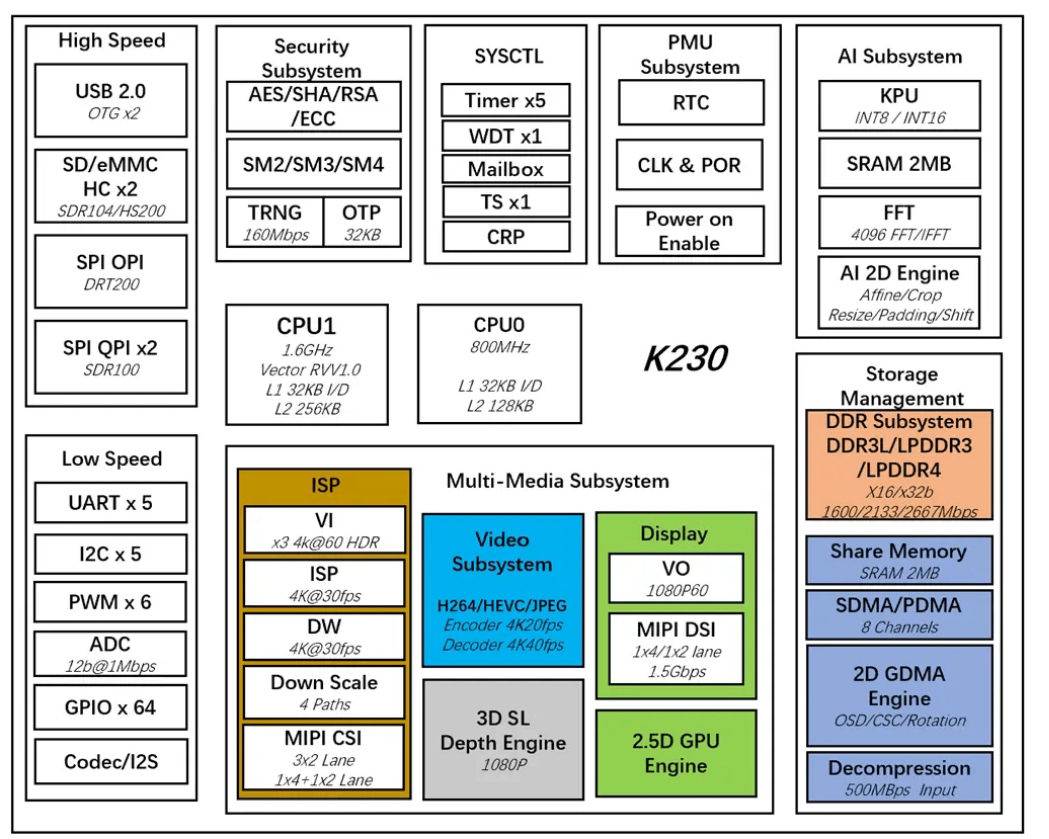
K230芯片大致框图如下,图源K230技术参考手册
K230芯片架构
核心是两颗玄铁RISC-V
C908,一个800MHz的小核cpu0,1.6GHz的大核cpu1。嘉楠官方给了两种开发方式,第一种是小核cpu0跑Linux,大核cpu1跑rt-smart的异构架构,另一种是纯rt-smart架构,似乎只跑在大核上。由于多核通信很麻烦,我只用了rt-smart版本进行开发。
环境搭建
k230
rt-smart开发环境配置需要两套,一套是rt-thread主线内核,另一套是基础镜像。
rt-thread内核环境
目前rt-smart的镜像构建只支持在Linux中进行,本人是在wsl2的ubuntu22.04下搭建开发环境的,相比于虚拟机稍微麻烦一些,但是性能会相对好一些,当然有能力还是直接Linux物理机了。
具体配置流程参考rt-thread
K230主线BSP ,简单的流程这里一笔带过,重点说明踩过的一些坑:
首先是GCC工具链:https://download.rt-thread.org/rt-smart/riscv64/riscv64-linux-musleabi_for_x86_64-pc-linux-gnu_251248.tar.bz2
,解压完成后在~/.bashrc中写入:
1
2
3
export RTT_CC="gcc" export RTT_CC_PREFIX="riscv64-unknown-linux-musl-" export RTT_EXEC_PATH="$USER /toolchain/riscv64-linux-musleabi_for_x86_64-pc-linux-gnu/bin"
然后是一些包:
1
2
sudo apt install -y scons python3-pip u-boot-tools patch
安装rt-smart所需环境(避免在rt-thread仓库目录下执行)
1
2
3
4
wget https://gitee.com/RT-Thread-Mirror/env/raw/master/install_ubuntu.shchmod 777 install_ubuntu.shrm install_ubuntu.sh
下载源码并配置环境:
1
2
3
4
git clone git@github.com:RT-Thread/rt-thread.gitcd rt-thread/bsp/k230source ~/.env/env.sh
还有rttpkgtool 用于对内核文件进行打包,注意是for-k230分支。
rtos_k230环境配置
rt-thread仓库主要是编译内核,还需要用嘉楠的工具制作一个sd卡镜像:如何编译固件
主要配置如下:
1
2
3
4
5
6
7
8
9
10
11
sudo dpkg --add-architecture i386sudo apt updatesudo apt install -y --no-install-recommends \sudo vim wget curl git git-lfs openssh-client net-tools sed tzdata expect \sudo apt clean
下面python环境配置有概率出现一个坑:
1
2
3
4
5
6
7
8
9
10
11
12
13
14
15
16
17
18
19
20
21
22
23
24
25
chuan@localhost:~/rtos_k230$ time make log env /home/chuan/rtos_k230/boards/k230_canmv_01studio/default.env => /home/chuan/rtos_k230/output/k230_rtos_01studio_defconfig/images/uboot/env.bin done .'mk_rtconfig' from 'menuconfig' (/home/chuan/.local/lib/python3.10/site-packages/menuconfig.py):"/home/chuan/rtos_k230/src/rtsmart/rtsmart/kernel/bsp/maix3/SConstruct" , line 31:env , RTT_ROOT, has_libcpu = True)"/home/chuan/rtos_k230/src/rtsmart/rtsmart/kernel/bsp/maix3/../../rt-thread/tools/building.py" , line 421:
因为rtos_k230用的是自己的menuconfig,而系统本身环境自带menuconfig,脚本找不到mk_rtconfig这个函数,因此弄一套虚拟环境:
1
2
3
cd ~/rtos_k230source .venv_rtos_k230/bin/activate
然后在这个环境中安装python环境即可
1
2
pip3 config set global.index-url https://pypi.tuna.tsinghua.edu.cn/simple
repo工具安装:
1
2
3
4
5
mkdir -p ~/.binchmod a+rx ~/.bin/repoecho 'export PATH="$HOME/.bin:$PATH"' >> ~/.bashrcsource ~/.bashrc
配置好git后,下载源码:
1 2 3 4 5 6 7 8 9 10 11 12 13 mkdir -p ~/rtos_k230 && cd ~/rtos_k230sync -j $(nproc )
系统编译
基础镜像编译
我们需要用rtos_k230构建出一个镜像(只需一次即可)
cd进源码目录,选择01studio的配置文件
1
2
3
cd ~/rtos_k230
然后执行编译:
如果没问题,会生成所需镜像:
1
2
3
4
5
6
7
8
9
10
TOC written at offset 0xe0000, size 448 byteswhile done , at /home/chuan/rtos_k230//output/k230_rtos_01studio_defconfig/RtSmart-K230_01Studio_rtsmart_local_nncase_v2.9.0.imgdone , board k230_canmv_01studio, config k230_rtos_01studio_defconfig
RtSmart-K230_01Studio_rtsmart_local_nncase_v2.9.0.img这个就是k230的镜像文件,找个sd卡用balenaEtcher或者类似的工具烧进去就行了。
内核编译
下面是内核编译,先cd进源码目录:
配置menuconfig并编译
1
2
scons --menuconfignproc )
目录下会生成rtthread.bin,然后用脚本对其进行打包并烧录(记得插入sd卡)
执行./flashsd.sh时,有可能会提示打不开SD卡,我们查看这个脚本内容:
1 2 3 4 5 6 7 8 9 10 11 12 13 14 15 16 17 18 19 20 21 22 23 24 25 26 27 28 29 30 31 #!/bin/bash source ./utils.shrealpath $(dirname $0 ))echo "BSP_PATH: $BSP_PATH " $BSP_PATH if [ $result -ne 0 ]; then echo "ERROR: rttpkgtool is unavailable! Please check your network connection!" exit 1fi pushd $BSP_PATH /rttpkgtool > /dev/nullif [ $result -eq 1 ]; then echo "ERROR: The kernel file to be flashed does not exist!" exit 1fi if [ $result -eq 2 ]; then echo "ERROR: The USB/SDcard does not exist!" exit 1fi echo "INFO: The kernel file has been flashed to the USB/SDcard successfully!" popd > /dev/null
实际上烧录用的是rttpkgtool/script/sdcard.sh这个脚本,打开这个脚本,把:
1
2
3
if [ -z "${DEST} " ]; then fi
将脚本中的/dev/sde改成sd卡实际挂载位置即可。
WSL2内核编译
wsl2还有其他问题,wsl2没法直接访问物理机的外部设备。因此,我们需要借助usbipd把Windows的USB设备通过网络分享给虚拟机。
windows安装:usbipd-win ,用winget或者msi安装都行。wsl2内核版本够新自带usbipd。除了这玩意以外,还需要单独编一份wsl2内核,因为wsl2内核默认没开启对存储设备的支持
先git clone源码下来:
1 git clone https://github.com/microsoft/WSL2-Linux-Kernel.git
然后安装依赖
1 sudo apt install libncurses-dev build-essential flex bison libssl-dev libelf-dev dwarves
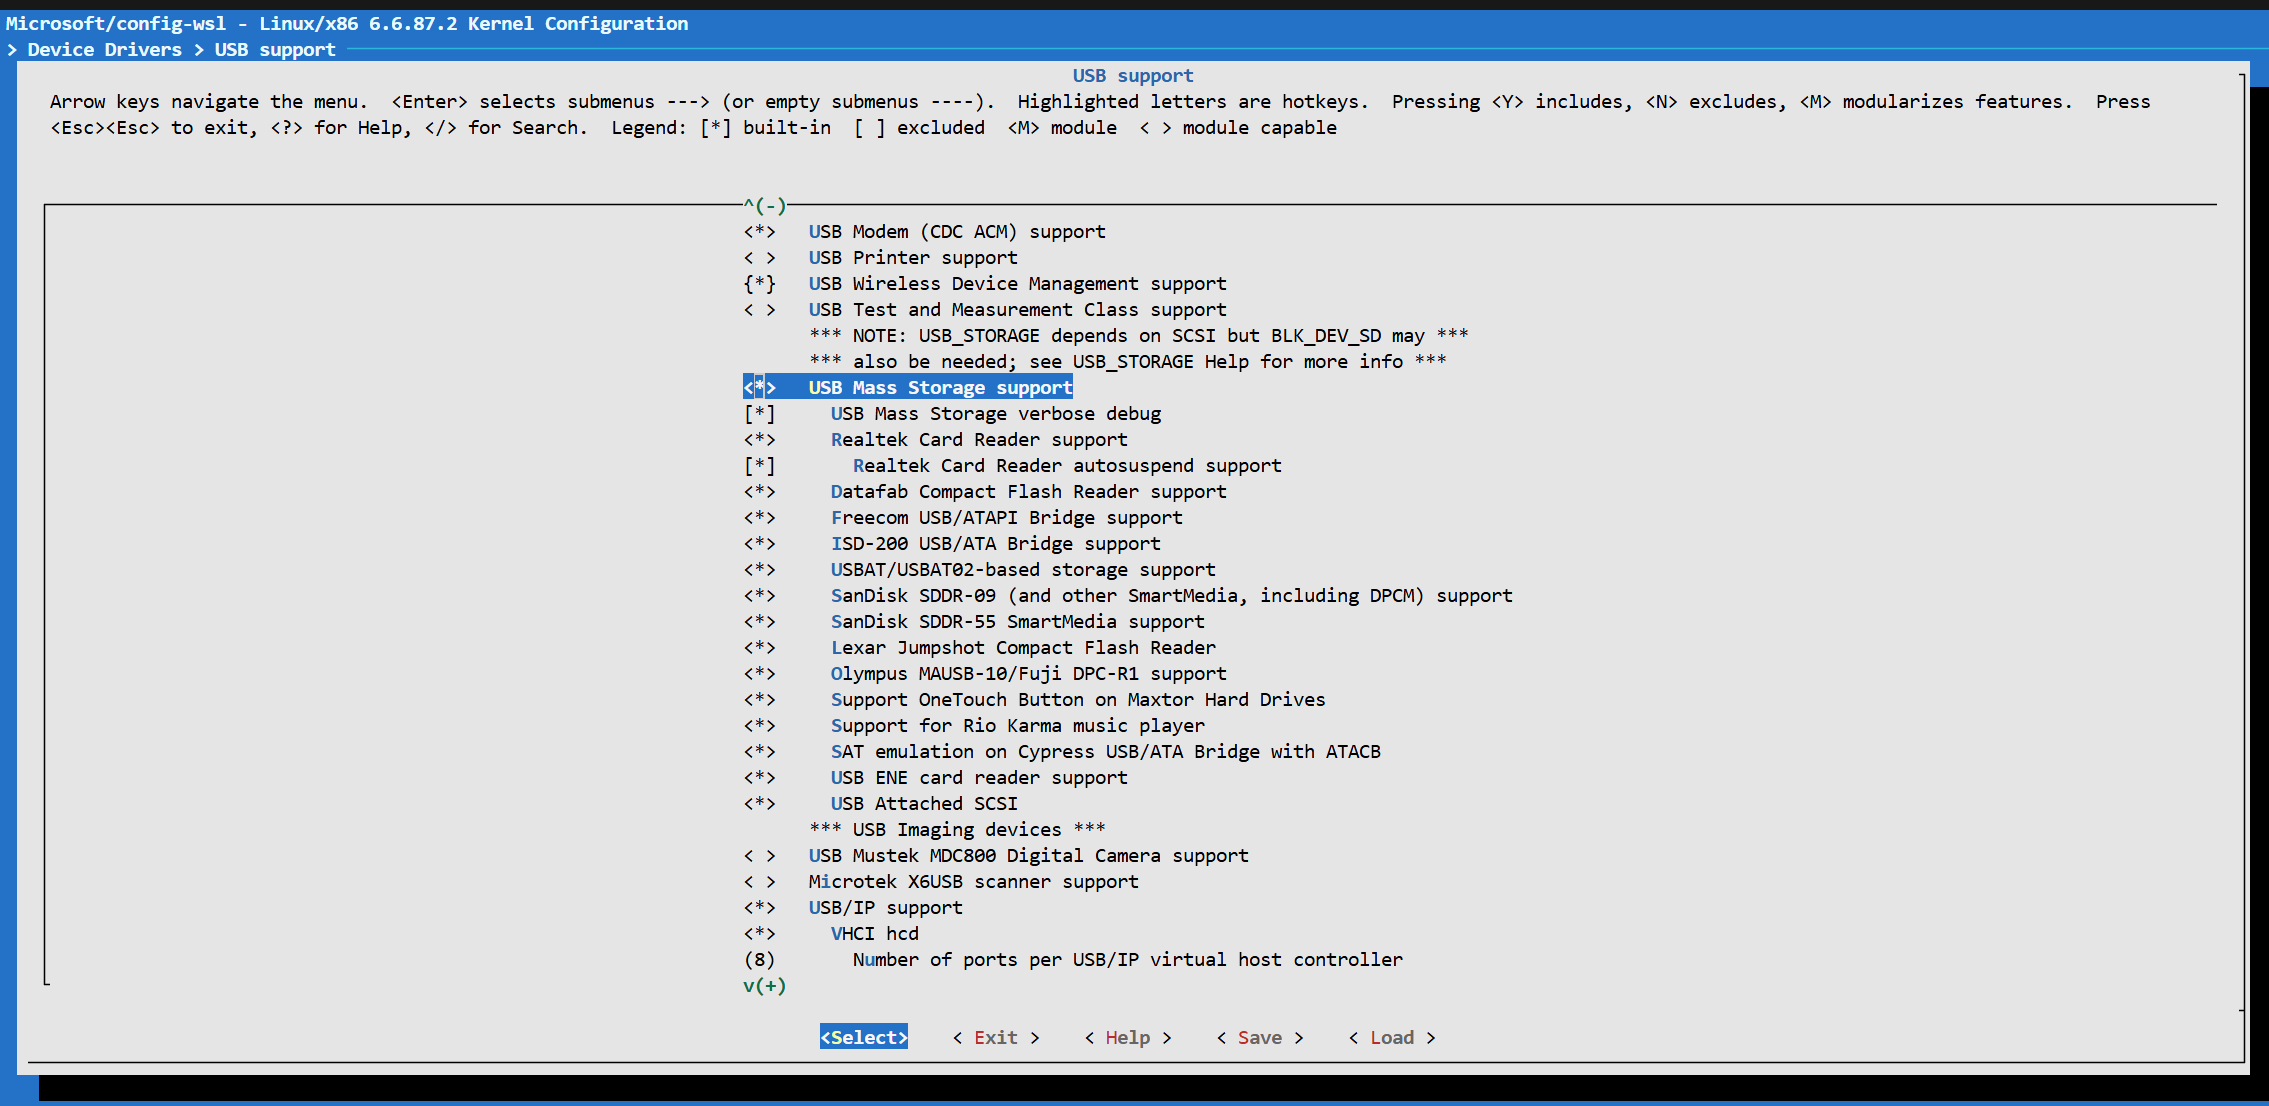
在menuconfig中勾选配置:
1 make menuconfig KCONFIG_CONFIG=Microsoft/config-wsl
然后再menuconfig中把Device Drivers -> USB support -> USB Mass Storage support下面全勾上就行了,记得打’*‘直接编译进内核,‘M’需要手动加载
wsl2内核menuconfig
然后编译内核:
1 make -j$(nproc ) bzImage KCONFIG_CONFIG=Microsoft/config-wsl
编译结束会在arch/x86/boot/下面生成名为bzImage的内核文件。
把内核文件复制出来,在C:\Users\用户名目录下的.wslconfig文件中加入(如果不存在就新建一个):
1
2
3
4
5
[wsl2]
如果需要新建就加第一行和最后一行就行了。
具体如何将USB设备共享给WSL2,参考微软文档:连接
USB 设备